OVERVIEW
This technical Log is to explain the apprentice universe app that we started in January and finished the first week of February. This is an extensive project in a short time but we are proud to present to you the results that we had. The functionality of this app is based on the need for a platform to help the training department of the company where I'm making my internship. The App is built with Java, Spring, and React technologies. In this short time, we also learned other technologies like Redux, PostgresSQL, Material UI, and dependency Jjwt. The main challenge was to dominate the new tools and made present results every week to our client. This project was pretty different than TODO app because I already have some knowledge about what to do. Around the project, we faced some difficulties with the times and results that we expected but as a team, we communicated together and made agreements to give results. I hope that you enjoy this reading as I did making this app.
Project Description
Apprentice universe is an App developed to simplify company organization in the talent development field. This refers to efforts to identify, train, and advance employees within the company. The client has an important need to control assignations to upskilling, and reskilling employees. The main functionality consists in connecting this goal properly with all the possible situations that this relationship between the trainer, the process, and the organization would have; for example, we have four different kinds of users; apprentice, stakeholder, admin, and super admin. We intent to give a tool where all these characters can interact each other with their own needs to accomplish the training process.
Also, is important to explain the main roles and app's items that we give for their functions. The apprentice is the training user who is receiving assignations, makes reports for the staff (stakeholders), and communicates issues around the training program. The stakeholder user manager a number of apprentices named batches, their function consists in supervising by creating, scoring, and giving feedback on assignments, receiving the tickets (it's how we named a blocker) or issues that apprentices report, checking daily status and learned reports, and adding Frequently asked questions. The admin section is divided between two users; admin and super admin. Admin is a user who can create apprentices' users, batches, and stakeholders, and visualize their assignments, tickets, and daily reports. Super Admin can manage the same that all other users but in addition, they can delete, change or archive information.
Back to the Top>>Functionalities
User - Apprentices:
This role can:
- Submit Assignments
- Follow up feedback and grade in assignments.
- Post a daily status that consists in a series of questions about how they are, if they have a blocker/issue/ticket, and what are they working.
- Post a Today I learned report, it's part of the daily status section but it's a different report.
- Review FAQs section to find quick answers.
- Review their own Daily Status, Today I learned, Tickets, and Assignments.
User - Stakeholder:
This role can:
- Receive Tickets for follow-up their apprentices in their batches.
- Give a resolution in their Tickets with a comment.
- Give feedback on the apprentice' solution in an assignment.
- Review the current assignments in their dashboard and an overview of how many people have given a solution.
- Review their workload of assignments and Tickets.
- RMake FAQs to add to the page.
- Create or edit individual assignments for users on their own batches.
- Review general information of their own batches.
User - Administrators:
This role can:
- Create new users and archive or edit existing one.
- Create, edit, and archive, batches.
- Edit roles in users.
- Assign batches to stakeholders.
- Create weekly assignments for a batch.
- Create, edit or archive assignments and deadlines.
- View a dashboard per batch with the content of assignments, reports, and tickets.
- Review users' information or interactions.
- View users' dashboard.
User - Super Admin:
This role can:
- Do everything other roles do.
- Delate users, groups, and assignments.
System features
This role can:
- OAuth login
- Supports different archives (.doc, .txt)
- Import users via CSV or text file
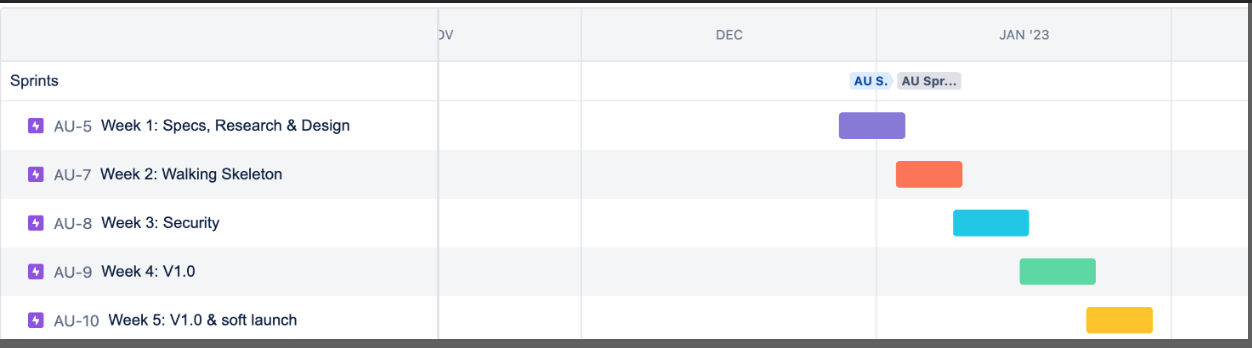
>>Teamwork planning
We decided to apply for our project The Agile Product RoadMap. It's a template where we can develop some strategic steps for our product and at the same time receive feedback from our clients, every term. This roadmap type can shift based on feedback. We consider that quality a tool to develop this project.
BackEnd
>>Backend structure
The backend was built using Spring Boot 3.0.1 along with Java 17.
The dependencies used were:
- Spring boot starter web: Starter for building web, including RESTful, applications using Spring MVC. Uses Tomcat as the default embedded container
- Spring boot starter validation: Package to validate parameters that are passed into a method of annotated classes.
- Spring boot starter data jpa: Focuses on using JPA to store data in a relational database.
- Spring boot starter jdbc: Data access technology used for Java database connectivity.
- Postgresql: To connect a relational database into a spring boot app.
Four dependencies were used for the security part of the application which implements JSON Web Token (JWT):
- Spring-boot-starter-oauth2-resource-server
- Jjwt-api
- Jjwt-impl
- Jjwtl-jackson
>>Project Structure
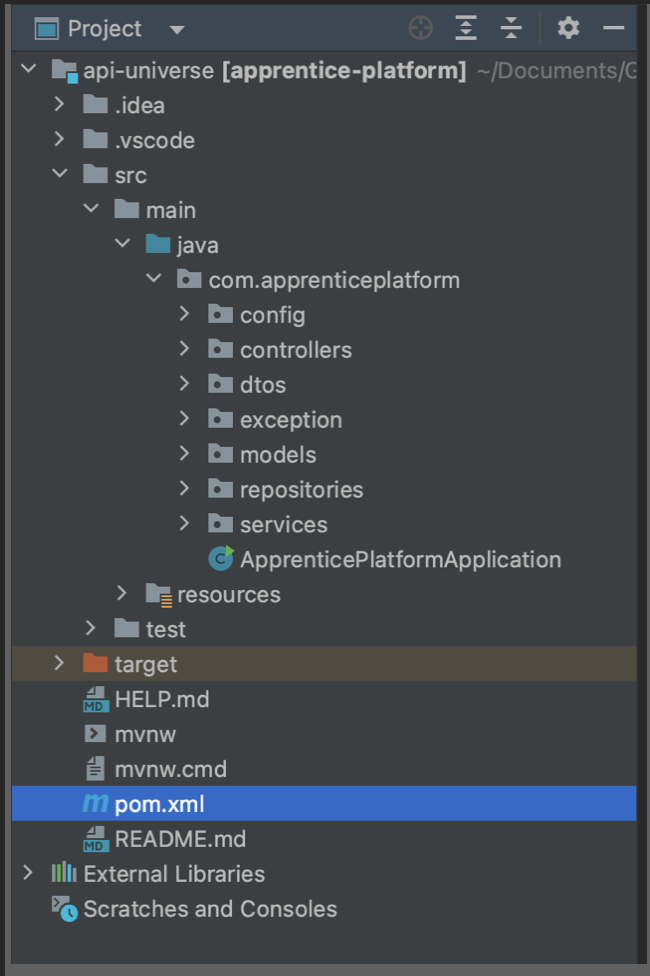
Packages:
- config: Holds the classes that configurate our security and token.
- controllers: Holds the controllers for, Assignments, Batches, Login, Ticket & User.
- dtos: Holds the data transfer objects to safely deliver a response
- models: The models that help us map the database tables
- repositories: Holds the controllers for, Assignments, Batche, FAQ, Login, Ticket & User.
- services: Contains the services layer used for the controllers
>>Models
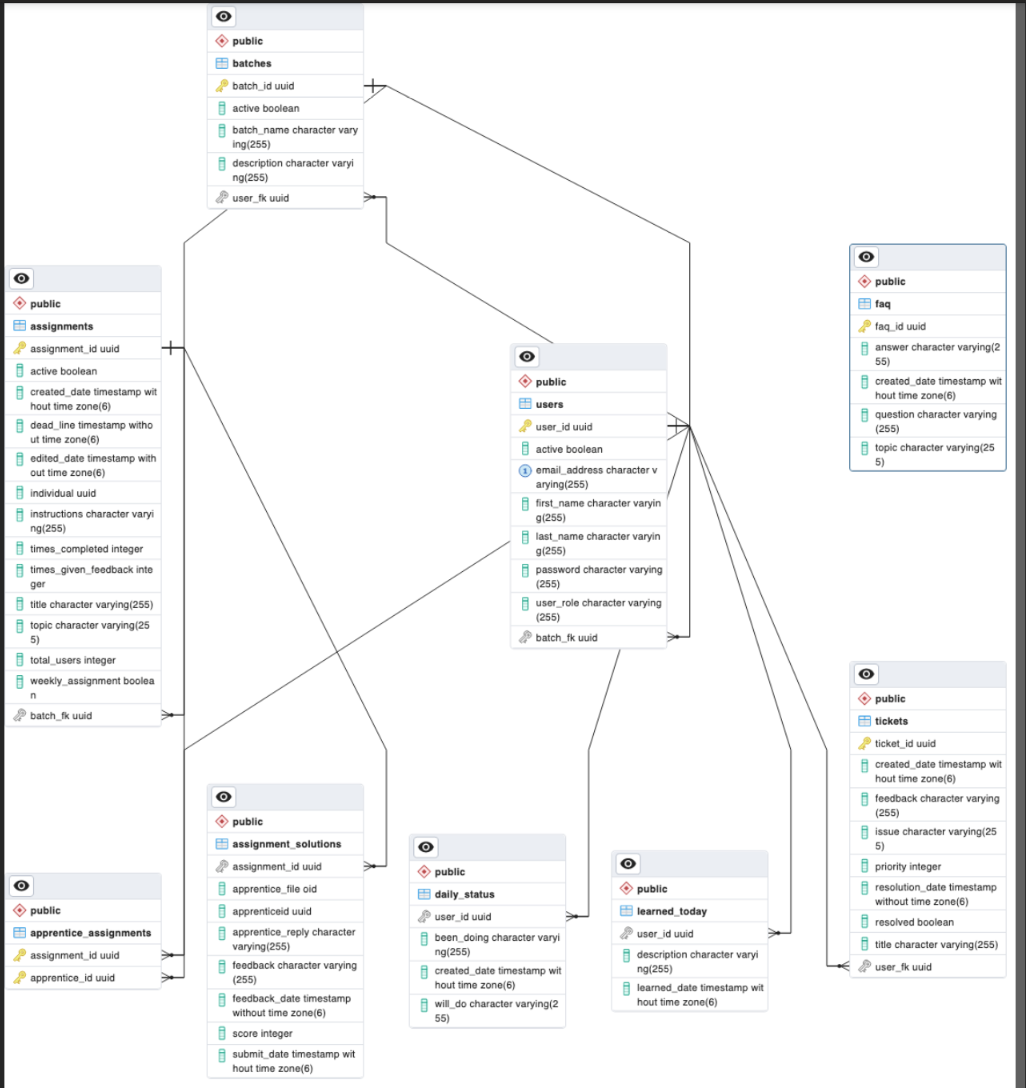
In this project all Entities will have automatically generated UUID for security purposes. Since we are using PostgreSQL to build the relationships between entities and tables, the full relationship diagram will be shown at the end.
User model - Entity
As an entity (@Entity Annotation), the user model will have its own repository, and is composed of the following fields:
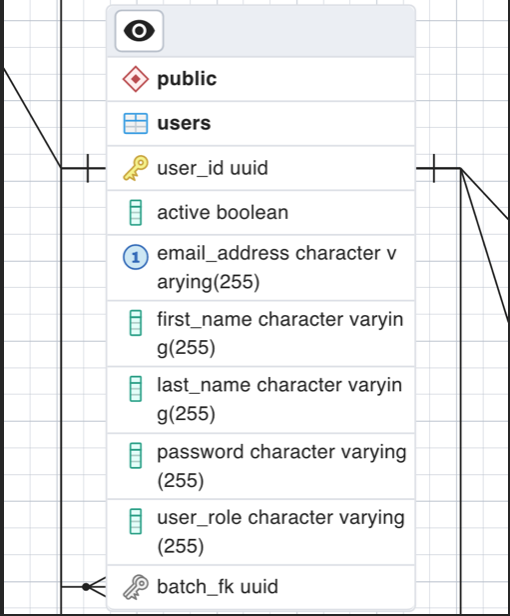
The User model is general for every user in the database with some restrictions depending the user role. As an “Apprentice” we can only be part of one batch linking the batch_fk (foreign key) field, whereas the other roles can own (but not be part of) different batches. In addition, only Users with the role “Apprentice” can hold assignments.
The way this user entity can hold e.g. several assignments is using a Set data structure, that will be linked through a table relationship. The relationships this entity has are the following:
- Many to Many Set “assignments” between User -Assignments: A user with the role “Apprentice” can have many Assignments entities stored and vice versa.
- Many to One field “userBatch” between Batch -User: A user can have one batch assigned if the role is “Apprentice”, and a Batch can have several users.
- One to Many Set “ownedBatches” between User -Batch: A user can own many Batches if the role is “Stakeholder”, “Admin”, or “Super admin” and the batch can only have 1 owner.
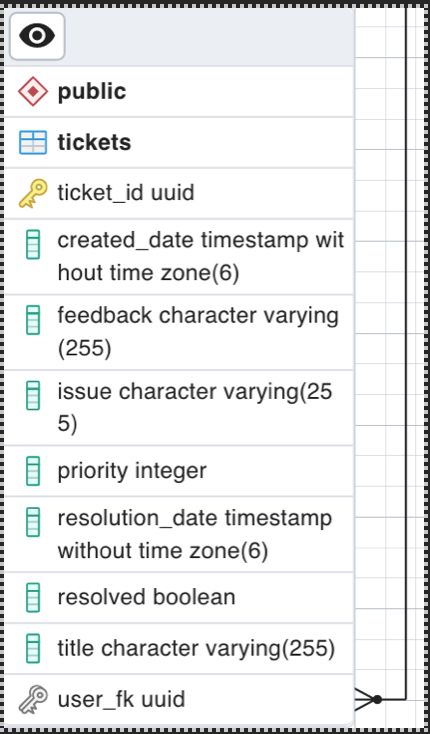
- One to Many Set “tickets” between User - Tickets: A user can have many tickets, but the ticket can only have one user.
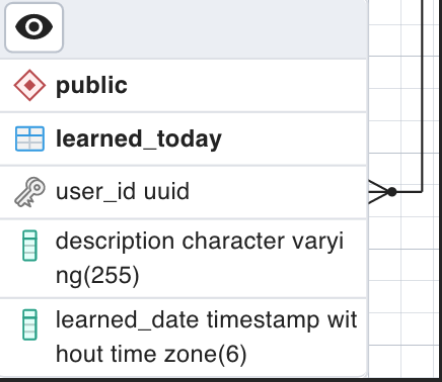
- Element Collection (One to Many) “learned_today” relationship between User -LearnedToday: A user can own several LearnedToday instances.
- Element Collection (One to Many) “daily_status” relationship between User - DailyStatus: A user can own several DailyStatus instances.
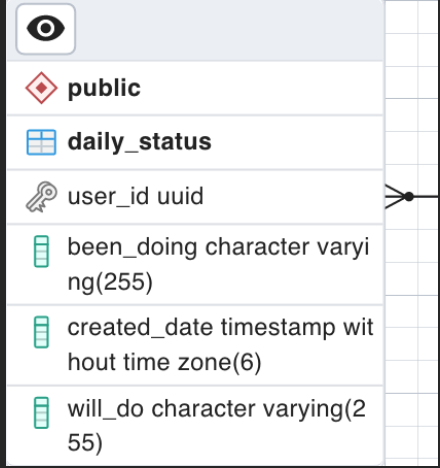
DailyStatus model -Embeddable
As an embeddable model (@Embeddable Annotation),
it won't have its own repository, instead,
it will be embedded as a Set, that is to say, a Table in each user model.
It is composed of the following fields:
LearnedToday model - Embeddable
As an embeddable model (@Embeddable Annotation), it won't have its own repository,
instead, it will be embedded as a Set, that is to say,
a Table in each user model. It is composed of the following fields:
Ticket model - Entity
As an entity (@Entity Annotation), the ticket model will have
its own repository, and is composed of the following fields:
Assignment model - Entity
As an entity (@Entity Annotation), the assignment model will have its own repository,
and is composed of the following fields:
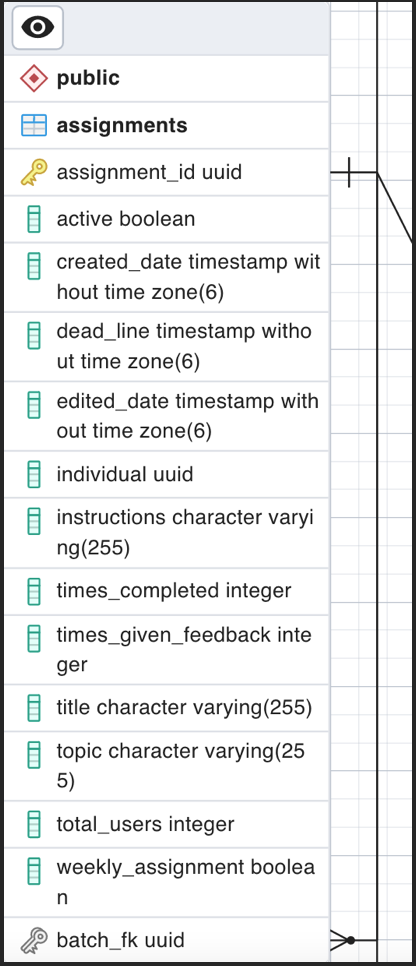
The way this assignment entity can hold e.g., several users is using a Set data structure, that will be linked through a table relationship. The relationships this entity has are the following:
- Many to Many Set “apprentices” between Assignments - Users: An assignment can have many users “apprentices” and a user can have many assignments.
- One to Many Set “ownedBatches” between User - Batch: A user can own several Batches if the role is “Stakeholder”, “Admin”, or “Super admin” and the batch can only have 1 owner.
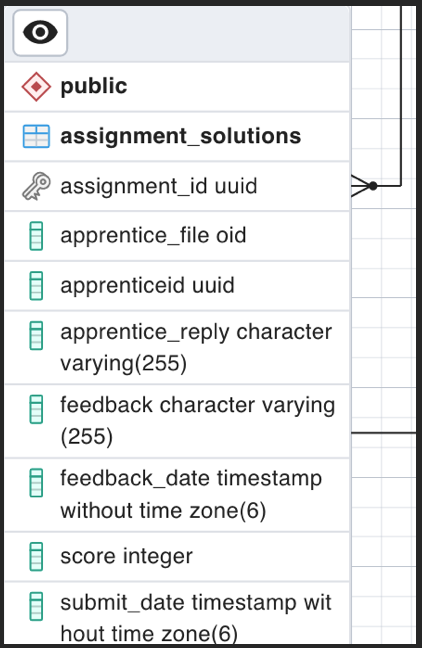
- Element Collection (One to Many) “assignment_solutions” relationship between Assignment - AssignmentSolution: An assignment can own several AssignmentSolution instances.
In addtition, this model can have other fields depending if the assignment is an individual assignment, batch assignment or weekly assignment:
- Batch_fk: If the assignment is a batch assignment, it will have a One to Many relationship with Batch, which means a Batch can have many assignments, but the assignment can only have 1 batch.
- Individual: The user UUID if the assignment is individual.
- Weekly_assignment: The weekly assignment will be true or false depending if it is marked as weekly.
AssignmentSolution model - Embeddable Join Table
As an embeddable model (@Embeddable Annotation), it won't have its own repository, instead,
it will be embedded as a Set, that is to say, a Table in each assignment model. It is composed of the following fields:
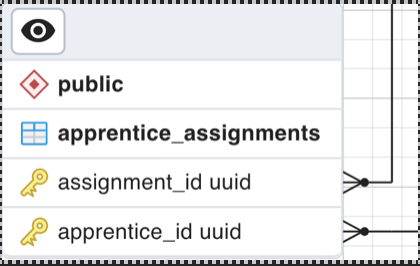
apprentice_assignments - Join Table
This is the result of the Many to Many relationships between User and Assignment,
it holds the relation between its UUIDs.
Batch model - Entity As an entity (@Entity Annotation), the assignment model will have its own repository, and is composed of the following fields:
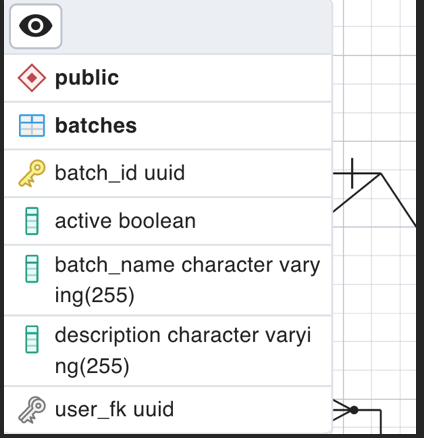
The way this Batch entity can hold e.g. several users is using a Set data structure, that will be linked through a table relationship. The relationships this entity has are the following:
- Many to One field “user_fk” between Batch - User: A batch can only have one user and a user can have many Batches if the role is “Stakeholder”, “Admin”, or “Super Admin”.
- One to Many Set “assignments” between Batch - Assignment: A batch can own many Assignments and an assignment can only own one batch.
- One to Many Set “apprentices” between Batch - User: A batch can have many apprentices whereas a User with role “Apprentice” can only have one batch.
FAQ model - Entity
As an entity (@Entity Annotation), the FAQ model will have its own repository,
and is composed of the following fields:
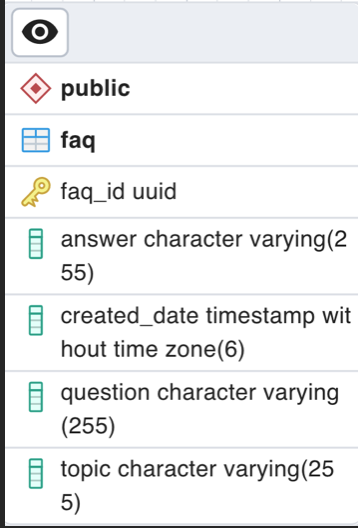
It is the only table that does not hold any relationship as it doesn't have any relevant information or linkage with the other entities.
Full Entity Relationship Diagram.
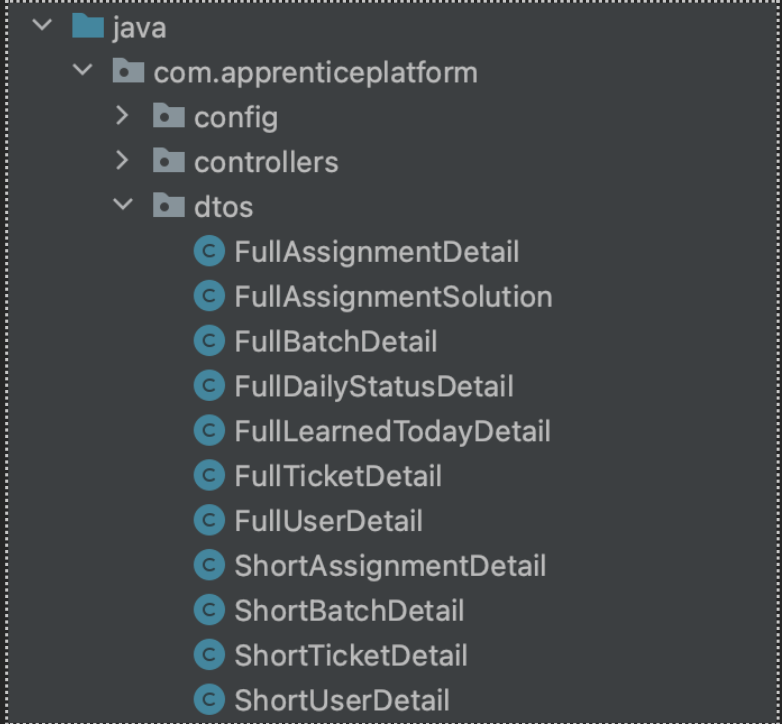
>>DTOs
It is not always a good idea for our API to expose the database entities to the client. Sometimes we want to change the type of data sent to the client, for example hiding sensitive data and sending only what is necessary. To achieve this, we can use a DTO which is an object that defines how the data will be sent over the network.
The DTOs that we created aim to hide sensitive information to the client, and only provide what is necessary, as you can see below,we have the full details which protect the entity layer, and short details for providing only the information that is needed.
>>Controllers
The controller layer is responsible for processing incoming REST API requests, preparing a model, and returning the view to be rendered as a response. The names of the methods are self-descriptive on what they do, here is a list of all the endpoints based on the controller:
Users
- getAllUsers()
- createUser(newUser )
- getOneUser( id )
- updateUserInfo(id, editedUser)
- deleteUser( id)
- getUserIDbyEmail(email)
- getAllApprenticeUsers()
- getAllStakeHolderUsers()
- getAllStakeHolderAssignments(id )
- getAllStakeHolderTickets(id )
- getUserAssignments( id )
- getUserStatus(id )
- postDailyStatus(id)
- getUserDailys( id )
- sendLearnedToday( id, learnedToday )
- getUserTickets(id)
- updateUserPassword(password)
Batches
- getAllBatches()
- createBatch(batchName, description, ownerID)
- updateBatchInfo(id, batchName, description, ownerID,active )
- deleteBatch()
- getOneBatch( id )
- getBatchAssignments( id )
- addNewApprenticeAndAddToBatch( id, newUser)
- addApprenticeToBatch( batchId, userId)
- addOwnerToBatch(batchId, userId)
Assignments
- getAllAssignments()
- getOneAssignment(UUID id)
- updateAssignmentInfo(id, editedTask )
- deleteAssignment( id)
- getAllAssignmentSolutions(id)
- sendIndividualAssignment( id, newAssignment )
- sendBatchAssignment( id, toAssign)
- createWeeklyAssignment( id, newAssignment)
- postAssignmentSolution(assignmentID, userID, file, apprenticeReply )
- postAssignmentSolutionFeedback(assignmentID, userID, score, feedback)
- getDownload(assignmentID, userID)
Ticket
- getAllTickets()
- getTicketById(d)
- newTicket( id,newTicket)
- updateTicket(id, feedback)
- deleteTicket( id)
Login
- register(request)
- login(request)
- getFAQ()
- postFAQ(newFaq)
- editFAQ(id, editedFaq)
- deleteFAQ(id)
>>Repositories
In the repository layer, we annotate our interface with the @Repository annotation to let know Spring through classpath scanning that this will be a repository. Then, we extend our interface to the CrudRepository from JPA so we can use filtering, paginating and functions for querying specific data that are methods included with the JPA dependency. The purpose of this layer is for providing pre-built functionality & other convenient features for querying, altering, & accessing your data from a connected data base or other data storage system. In our case via this repository, we make queries to the PostgreSQL database, the crud repository saves us from manually writing the queries. Additionally, in the repositories we used projections to send back data to the client in form of a DTO rather than directly sending the entity that will be explained in the following section.
>>Spring Data JPA - Class based Projection
As we stated before, the goal of a DTO class is to provide an efficient and strongly typed representation of the data returned by a query. A DTO consists of a set of attributes, getters and setters and a constructor to set all of the class attributes. In order to use a specific DTO for projection you need to type an SQL query, but instead of selecting as we would normally do, we need to use a constructor expression in the query. It describes a call of the constructor. It starts with the keyword new, followed by the DTO class's fully-qualified class name and a list of constructor parameters this is executed by using the @Query annotation. The persistence provider then executes a query that selects the columns mapped by the referenced entity attributes and executes the described constructor call.
These projections can be seen in the repository files of the project, we need to explicitly state in our DTO class what kind of information we need, then in our repository we can start writing a query with the @Query annotation. To better understand the instance method by SQL query we can see this example:
SELECT new com.apprenticeplatform.dtos.ShortBatchDetail(b.id, b.batchName, b.description, bo.id, bo.firstName, bo.lastName, b.active) FROM Batch b JOIN b.batchOwner bo WHERE b.active = true
As we can see, we need to instance our DTO making use of the new keyword, followed by the path where our DTO is and explicitly populating the fields our DTO needs to be built using the SQL query. Note that data types pulled from our tables need to strictly match for the DTO data types to be built. This way we can extract any information we need from our tables without only relying on the JPA interface built in methods.
The service layer is there to provide logic to operate on the data sent to and from the data access object and the client. This is good practice arising from what is known as the single responsibility principle. The Service layer's single responsibility is to do any logic required with the data received by the Controller. We use layers to allow us to abstract away the underlying implementation so we that we can easily change it. This way the controller layer will not be implementing any logic, and instead directly call the methods from our services.
Back to the Top>>Services
Frontend: This is something that I would have liked to fix in time. I forgot to fix the
problem with the buttons that aren't hidden when a module comes out.
Also, sometimes the application didn't reload when it was a new time or when you clicked Done/Undone
It happened because I used a variable that in time doesn't change because the component isn't active.
I should connect better that section. It's because I have to practice the use of hooks, and I might need
to understand better how the hooks are working in React. Moreover, I should make betters practices when I'm building
components, it would make it easy to fix and get improvements in the code.
>>Security
Here are the contents of the config package.
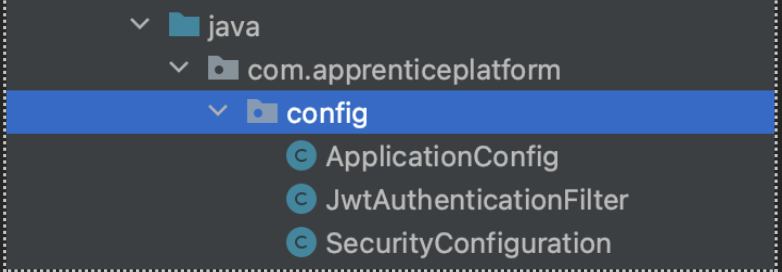
This part of the application focuses on configuring the REST API's security to meet our needs.
Initially in our User entity we implement User Details to store user information which is later encapsulated into Authentication objects.
Files:
- ApplicationConfig: In this file we declare @Beans that we will later use in the other configuration files. The following are the Beans declared: userDetailsService() for finding the user by email address, authenticationProvider() a class that can process a single Authentication implementation, here we set the UserDetailsService (email), and password to perform authentication. authenticationManager() container for authentication providers, giving a consistent interface to them all, and passwordEncoder() which uses BCryptPasswordEncoder() to save the user's hashsed password to the database.
- JwtAuthenticationFilter: In this class we extend the OncePerRequestFilter which tells SpringBoot, so that we guarantee that our specified filter is executed once per given request. In the overridden method doFilterInternal() we extract the header from the client request, we check for “Bearer” at the beginning of the header if it's not present it will simply continue with the rest of the filters, otherwise it will begin extracting the username and checking if it's in the database, if this is succesfull then we generate a new token, and set the token details to be sent back to the client.
- SecurityConfiguration: In this class we will use some of the beans declared in the Application config, in the method securityFilterChain is where we really configure our app's security, the first thing that we do is disable the cors and csrf, then using the requestMatchers, we specify any endpoints that we want to leave without security such as login and register. Then we secure the rest of the endpoints so that all users must be authenticated to access such endpoints. Before the http.build() we add more information, we pass in the authenticationProvider bean, and also specify to add the jwtAuthFilter.
It is important to note that in order for this to successfully work prior to this we had utilized the services specific for the authentication.

Files:
- AuthenticationService: In this class we refer back to some of the beans created in config and have two main methods, register and authenticate. In the register() method we take in a request which includes all of the user info, and where we save the user to the repository, we also generate a jwt token. Here an AuthenticationResponse is getting prepared to be sent back with the jwt token. In the authenticate() method we take in a request containing an email and a password and then we check if the user is valid, then we generate a token and send it to the client.
- JwtService: This class has methods that deals with the aspects of token generation, checking if it's valid, the expiration, adding specific claims to be sent back to the client.
>>Database
The database management system used for storing the application data was PostgreSQL. The requests to the API are handled by
The database is hosted by Amazon AWS with Amazon RDS service.
Back to the TopFrontend
For the frontend of this application the following technologies were used:
- JavaScript.
- ReactJS.
- Redux.
- Material UI.
- Axios.
The application was created with the React.js framework, with the source code written in JavaScript. The build tool used to compile the project was create-react-app.
Material UI was chosen as the React UI framework library to create most of the UI related components. Material UI offers components out-the-box components that facilitate the creation and design of the application. The documentation on Material UI and its use can found Material UI here
Most of the data and the states used to store said data were handled with the Redux library. And the data was passed between the front and the backend with the help of library Axios.
For managing the authentication, we used jwt-decode library, which manages the transfer of JWT tokens between the front end of the application and the API.
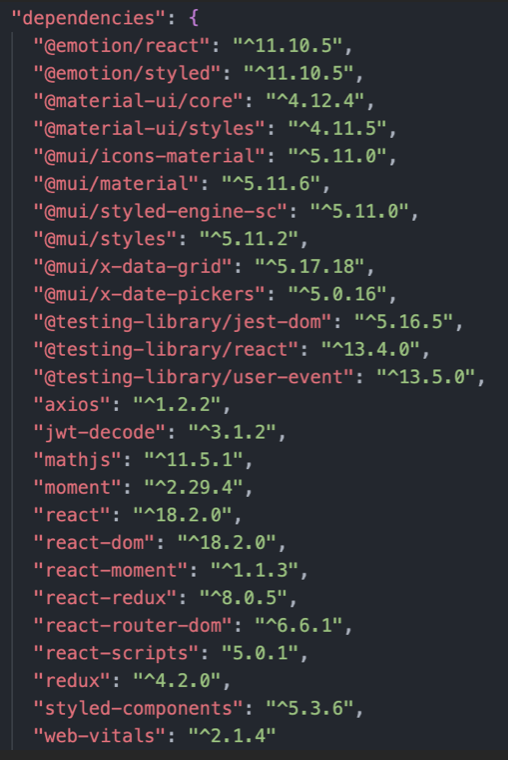
Every dependency used for the application can be found on the dependencies section inside the package.json file located on the root of the project.
The front end of the application was deployed using Vercel.
Back to the Top>>Project Structure
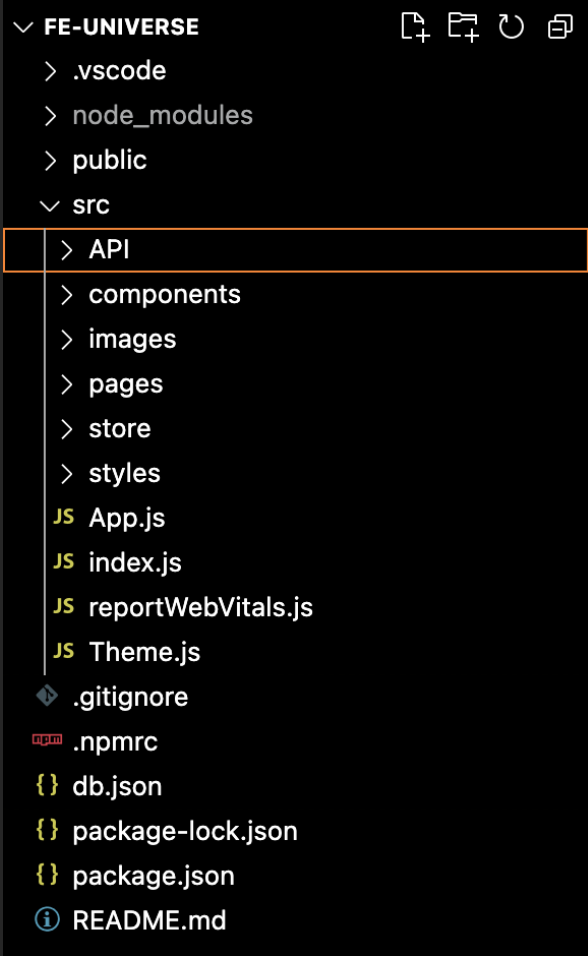
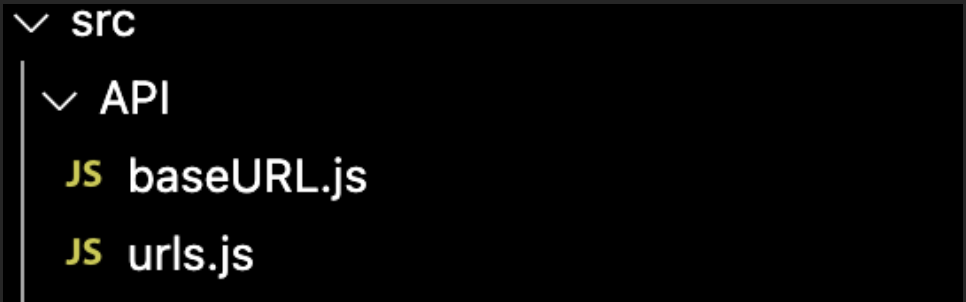
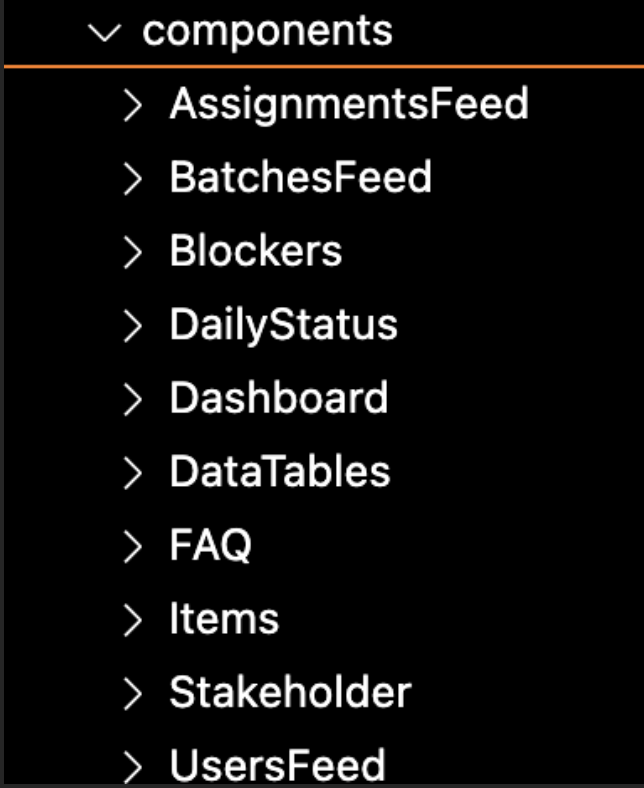
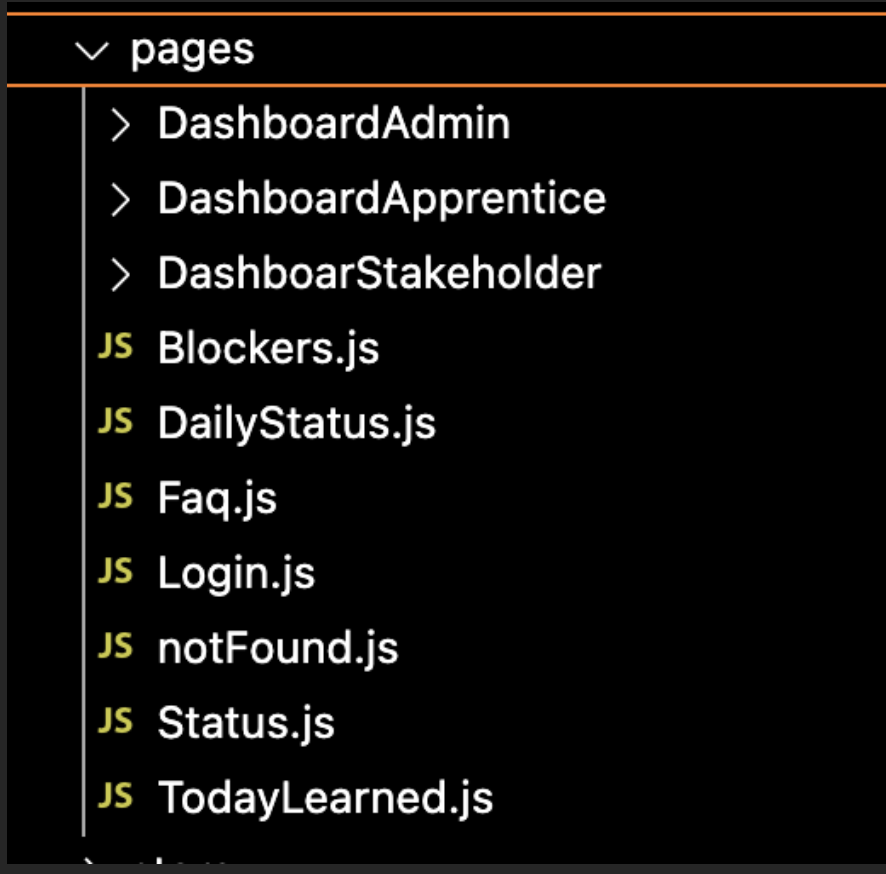
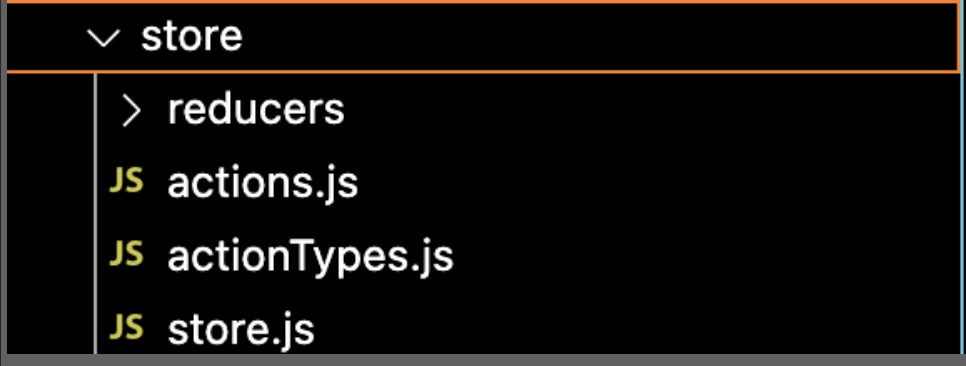
The src directory contains most of the code for the application. Inside the src directory you can find the following directories:
API: This contains all of URL data to get in a cleaner way the link to set in the HTTP request.
Components: This contains a series of folders which contain our components for the whole app. Each directory is related to a page component.
Images: The only picture we used was the company Logo.
Pages: This contains the pages that conform our application in all the users' views. The main components for each view or dashboard are contained inside this directory.
Store: This contains the Reducers folder were reduces for Redux are store. Also, the actions function to store the data in our redux variables.
Styles: This contains the styles for our application. Also, we use a theme using the Material UI. You can find it at Theme.js file in the structure folder.
>>App Structure
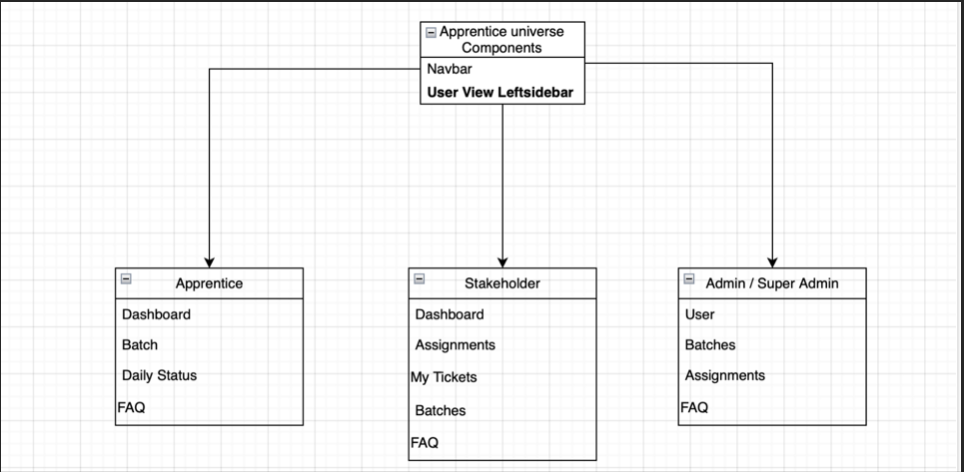
Apprentice Universe consists in three different views and
components depending of the user's role. In common they have
some components but the general view only has the navbar and a
left-sidebar with a dynamic menu.
In this section we want to explain you the components per user.
Some of them have components in common but with some permissions that
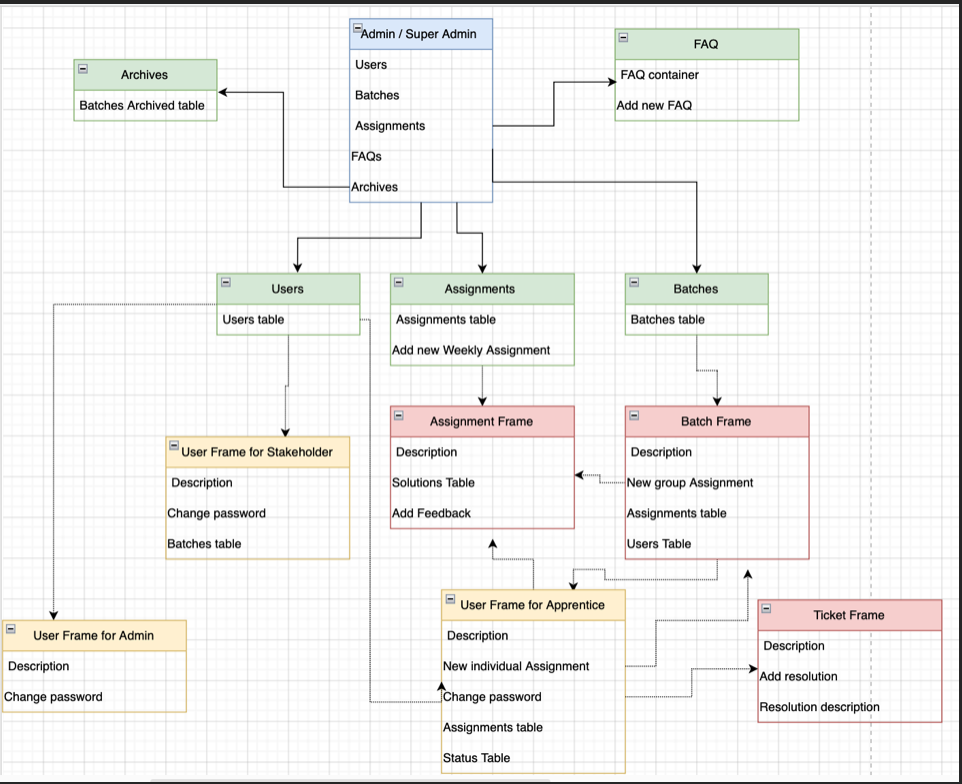
make them different between user's role. The next picture is a resume of
the components in the application. All have in common the navbar and the
left-sidebar contents the dynamic menu that you can see in three versions;
Apprentice, stakeholder and Admin/ Super Admin.
This is a video about the aplication, so you can see the elements in each user role:
>>Apprentice Universe Components
Apprentice
Stakeholder
Admin/SuperAdmin
>>Styles
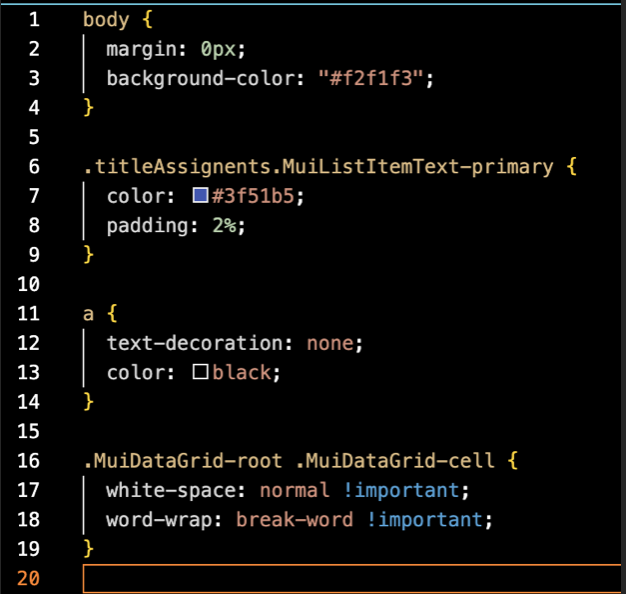
For styles we have 2 style files and one theme component to manage the style of Material UI components.
App Style
This file contains the style of app component. It's the body of our application. Also, some other lines that style classes form material UI and change specific colors that are default in that library.
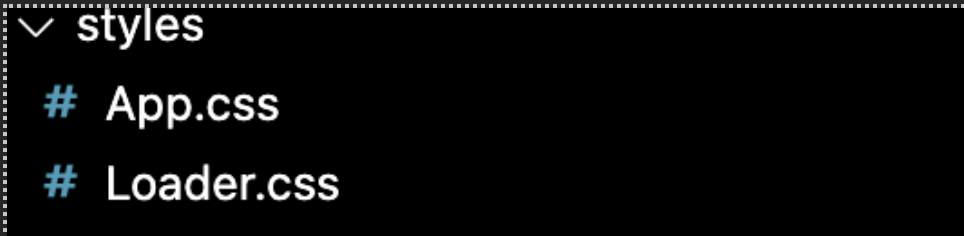
LOGGING Style
There is an animation that you can see when you sign in the application. As you are waiting for the sign in request it's present routing. This is built whit CSS. You can find the file in src/styles/loader
Back to the TopTheme Style
In the header of some components, you will find this function:
const useStyles = makeStyles((theme) => ({});
It's a style hook that we use to set style in the specific components where we mark using a class. We build a specific class name “classes”
const classes = useStyles();
When we want to style a component, we just add in ClassName={classes.itemExample}, and we add “itemExample” inside the MakeStyles like this
onst useStyles = makeStyles((theme) => ({


                            ItemExample: theme.pallete.primary.main,


                            });
When we selected a specific color from the theme it goes for the default theme that material UI has. In our case we wanted a specific theme. Material UI has the option to set a custom theme. We built a theme component that you can find in src/theme.js
>>Routes
There are several routes inside the front application. The routes were implemented using React Router. Most of the code implementation for the user routes can be found on the dashboard files for each user role.
For example, for the Apprentice role routes, go to the src/pages/DashboardApprentice directory where the DashApprentice.js file will contain the logic involved to handle all the Apprentice related routes.
Each route serves its purpose and some routes are only accessible by certain roles. Here are most of the routes and their use:
- /login: The login page and the landing page for not signed in users. This page is only available for users not yet signed into the page, and attempts to enter any other route will redirect to this route.
- /app/faq: This route contains a FAQ section for the Apprentices, where both the Admins and the Stakeholder can create, edit and delete questions.
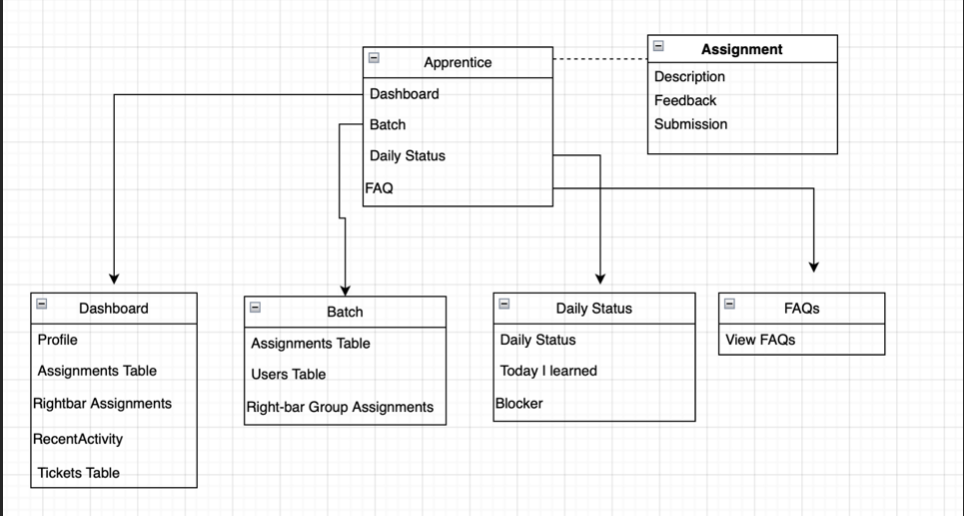
Apprentice routes:
- /app/user/dashboard: The landing page for the Apprentice. Here the Apprentice a summary of their current and past assignments, and also a brief list of the tickets submitted by them.
- /app/user/batch: The Apprentice will be able to find information related to their batch. They will also find the assignments for their batch.
- /app/user/dailystatus: Here the user will be able to put their status for the day. This status is divided into daily status, today I learned and blockers.
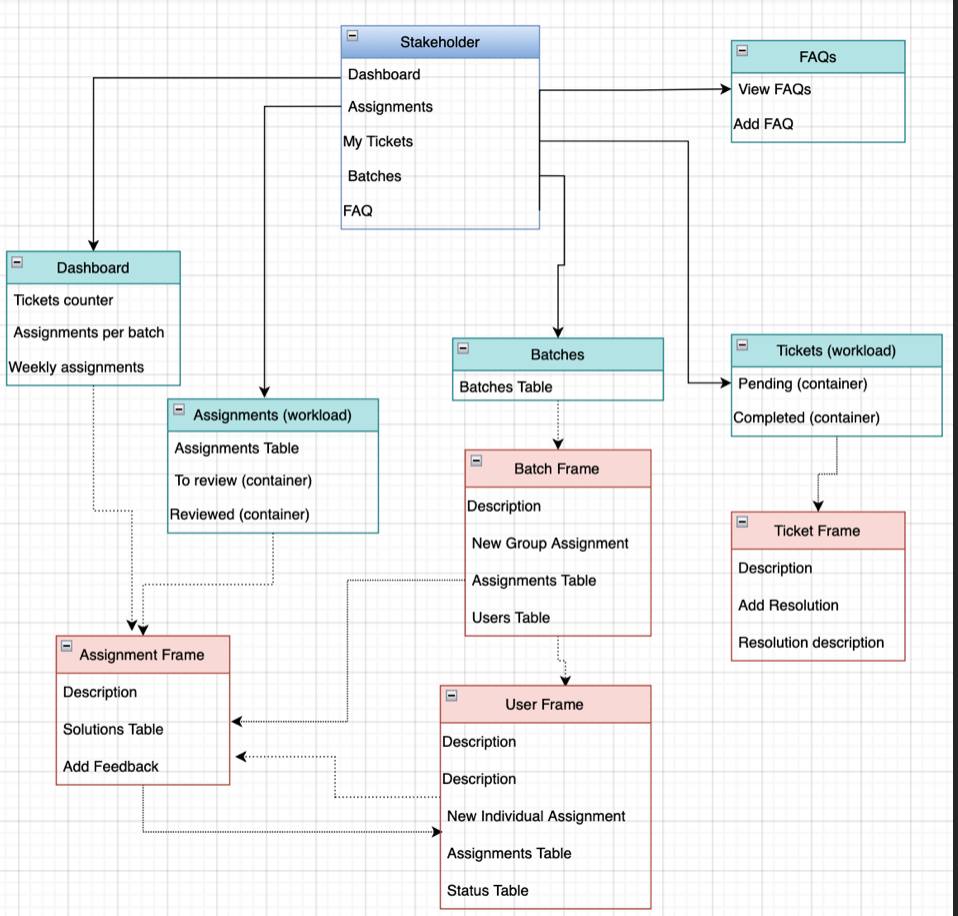
Stakeholder routes:
- /app/stakeholder/dashboard: The landing page for the Stakeholder. Here the Stakeholder will be able to see a brief summary of the tickets and submissions they are in charge of following up.
- /app/stakeholder/tickets: A more detailed view of all the tickets the stakeholder must
- /app/stakeholder/batches: Here the Stakeholder will be able to see a list of all the batches they supervise.
- /app/stakeholder/assignments: This a more detailed view of the all the assignments that have been submitted by Apprentices of batches the Stakeholder supervises.
Admin routes:
- /app/admin/users: Here the Admin will be able to see a list of all the Users registered into the app, as well as be able to create and edit users.
- /app/admin/batches: This page allows the Admin to see all the current registered batches and also allows the Admin to create and edit batches.
- /app/assignments: A general view of all the assignments created. Here the admin is also capable of creating and editing assignments.
If the user posts a request to a non-existent URL, they will be redirected to a 404 page to indicate that the route the user entered doesn't exist.
Back to the Top